Enhance your profile by adding photos to your bio page. This is an excellent way for members to connect with you on a more personal level. This article provides information about how to upload photos, create albums, and organize your photos.
Table of contents
- Promotional Image
- Public and Private Photo Albums
- Photo Guidelines
- Profile (WON) Photo Preview Tool
- How to Create an Album
- How to Upload Photos to Your Album
- Editing Photo and Photo Album Titles
- Organizing Album Photos
- Deleting Photos and Photo Albums
Before you can broadcast, you must upload at least one non-explicit photo to your promotional album. While you can add multiple photos, only one can be set as your profile picture, which will be displayed on the “Models Online Now” page.
Please note that photos in your promotional album will not appear on your bio page for members. To ensure your images are organized and accessible, we recommend creating additional photo albums before uploading photos.
Public and Private Photo Albums
There are two types of albums you can create: Public and Private. Create Public albums to share your best work with everyone, and Private albums to offer exclusive content to your most dedicated fans.
Public albums are visible on your profile and available for all members to see. You can choose to make them accessible to everyone, including guests, or limit viewing to members only.
Private albums are listed on your bio page and available for members to purchase. Private albums are only viewable by Premiere members or Fan Club members.
Ensure that any photo you upload adheres to our Terms of Use and meets the following criteria:
General Photo Guidelines:
- Photos must be in .JPG (jpeg), .PNG, .PCX, or .BMP format and have a file size no larger than 20MB.
- Photos cannot be copyrighted.
Promotional Image Guidelines:
- Photo dimensions should be widescreen with an aspect ratio of 4:3 or 16:9, with dimensions between 200 x 150px and 1000 x 562px, with a minimum resolution of 72dpi.
- Your face must be clearly visible and match the primary model of the stream.
- Photos cannot contain:
- Copyright protection
- Poor resolution or pixelation
- Custom frames, text, or graphic overlays
- Unauthorized endorsements or badges
- Your contact information
- Subject matter that violates the Terms of Use
- If your profile photo is rated PG or PG-13 (fully clothed), it will appear in the “Who’s Online Now” section on the homepage for both guests and members across all Streamray sites.
- If your profile photo is rated R (partially or fully nude), it may be restricted from the “Who’s Online Now” section on certain Streamray sites but will remain visible to all logged-in members.
- X-rated (sexually explicit) images must be uploaded to a photo album other than the promotions album.
All images undergo review by Streamray staff, and the approval process may take 24-72 hours. Upon approval, a rating is assigned based on the photo composition.
Profile (WON) Photo Preview Tool
Here, you can use our WON Preview Tool to upload your picture in the correct size and see exactly how it will appear on your WON page. If you’d like to try a different photo after reviewing one, just click “Reset” (which appears after uploading a photo) or simply drag and drop your new photo in its place.
- Log into your model center at https://models.streamray.com/
- Hover over “My Stuff” in the navigation bar, then click on “My Photo Albums”.

- Click on “Create Album”.
- Provide a title for your album to inform members about its content.
- Select either the “Public” or “Private” button based on the type of album you wish to create.
- Choose the audience for the album, “Everyone” or “Members Only”, and set the appropriate price for a Private Album.
- Click “Create”, and the album will now be visible in the left pane.

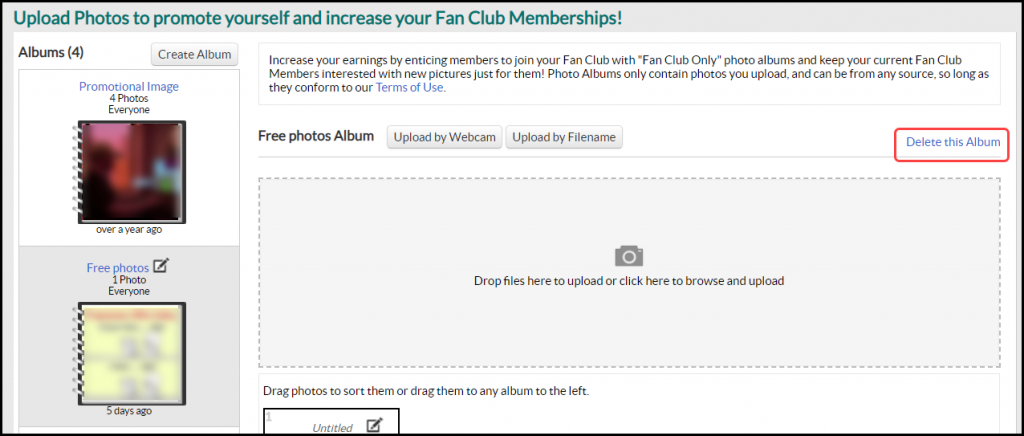
How to Upload Photos to Your Albums
Now that you’ve created albums, you can upload photos to your profile. On the My Photo Albums page, there are three methods you can use to upload photos to your profile.
- Upload by Webcam (For Promotional Images Only)
- Click on the “Upload by Webcam” button.
- A pop-up box will appear with a preview from your webcam.
- Click on “Take Photo” when ready, and the image will be saved to your Promotional Image folder.

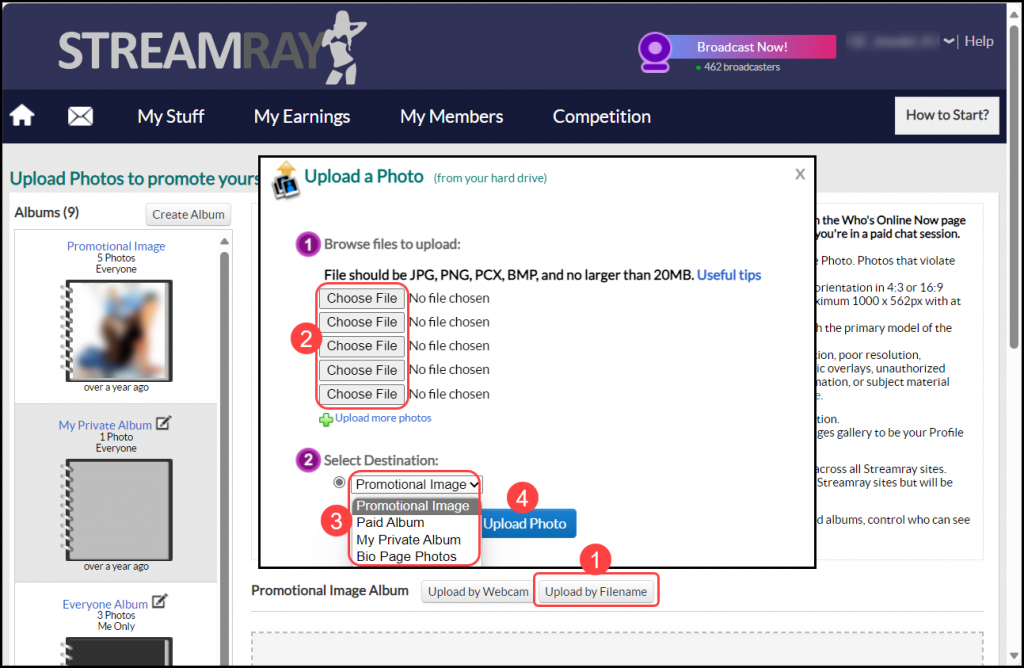
- Upload by Filename
- Click on the “Upload by Filename” button.
- Click “Choose File” and navigate to the image on your computer. (Repeat this step for additional images.)
- Select an album from the drop-down menu.
- Click “Upload Photo”, and the photo will be saved to your chosen album.
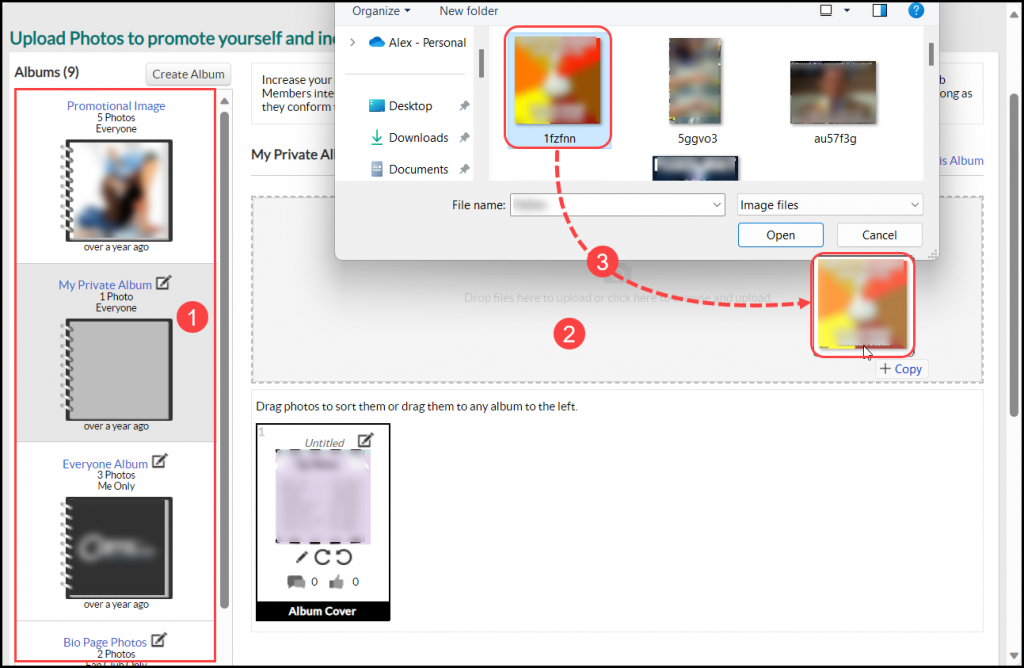
- Drag and Drop Image Files
- Click on the album where you want the images to be uploaded.
- Click on the camera icon in the middle of the page to open a browsing window; navigate to the image you want to upload.
- Drag and drop the selected image into the field with the camera icon.
Editing Photo and Photo Album Titles
You can edit the titles on your photos and photo albums by clicking on the edit icon located in the top right corner of the thumbnail. To save your changes click on the “Update” button.
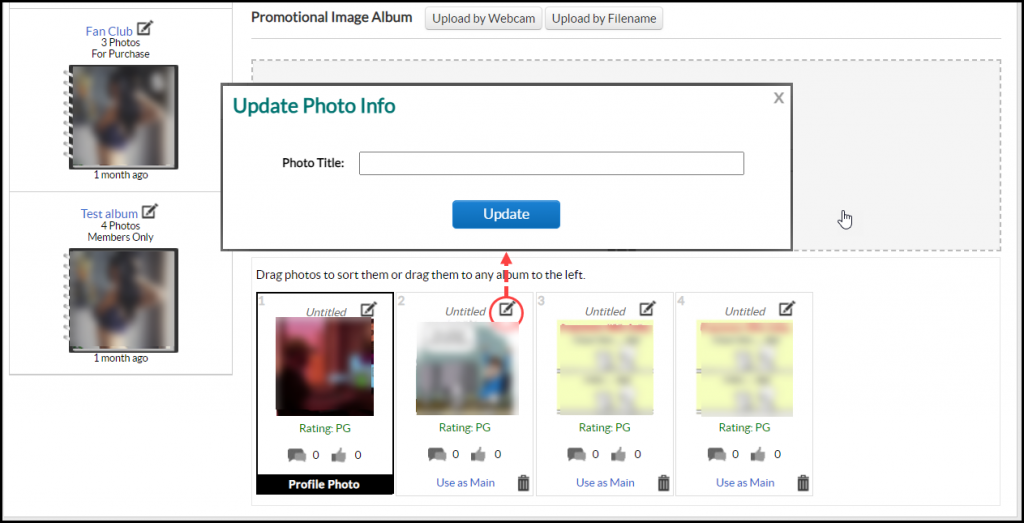

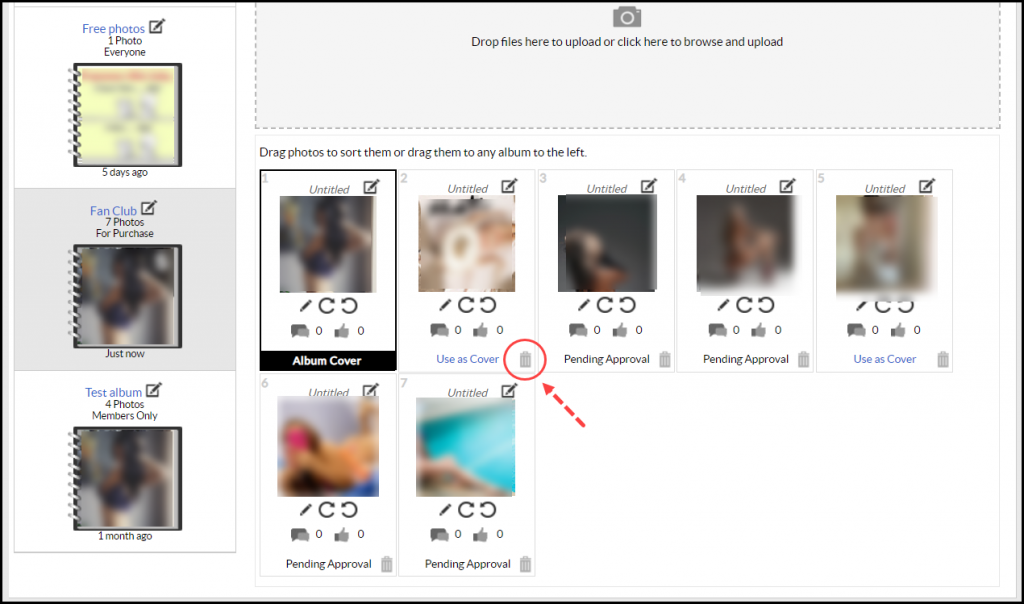
You can rearrange the order of your album photos by dragging and dropping each image to its desired location within the album. To set a specific image as the album cover, simply click on the “Use as Cover” button.

Additionally, you have the flexibility to move an image from one photo album to another using the drag and drop method. Click on the image, hold down the mouse button while dragging it to the desired folder.

Deleting Photos and Photo Albums
Deleting an image from a photo album is a straightforward process. Click on the “trash icon” located in the lower right corner of the image. It’s important to note that images are permanently deleted from the album once this action is taken.
For Public albums, the deletion process involves clicking on the album in the left pane and selecting the “Delete this Album” link.
Private albums, specifically those created for Fan Club members or for purchase, are not eligible for deletion. Adding a photo to an album that is for purchase is PERMANENT. You will not be able to delete any photos within an album that has been purchased by a member. This ensures the integrity and exclusivity of the content within these albums is maintained.